How to create search term-based content: A step by step guide.

The Google Ads Condition allows you to change content on your website according to the user’s search term to users arriving from Google Ads campaigns.
Make your visitors feel like they have found exactly what they are looking for!
The Google Ads condition is extremely powerful and practical. Setting it up only takes a few minutes and the results are amazing and immediate! By making a minor change to your landing page title or image, you can make any user feel like they have found exactly what they are looking for, which will greatly improve your ROI from Google Ads campaigns.
For example, If a user searches for your product name + recommendations, you can indicate in the headline that your product received particularly high recommendations. If they searched for the product name+price, present price-related information (Graphics: mobile phones, starting at $ 69) and so on, for every product.
How to set up search term-based content using If-So?
Setting up dynamic content according to the search term is extremely simple. No coding is involved.
First, you’ll have to create a Dynamic Trigger using If-So, a dynamic trigger consists of a condition (or several conditions) and a version of the content that will be displayed if it is met.
The second step will be to tell Google Ads which content version to display for each search term. This is done by simply pasting a short string of text that will be generated by If-So during the creation of the dynamic version.
Part 1: Creating dynamic content versions
In this step, we will create two (or more) content versions. It can be versions of any element of your site: Title, text, images, etc.
The dynamic version will be displayed based on a query string that will be added at the end of the URL. For example:
Users who visit the URL your-site.com will see a standard version of your website, while users who visit the URL your-site.com?ifso=red will get to the exact same page with the dynamic content replacing one of the elements or added to the standard version of the page.
- On your WordPress dashboard, go to “If>So → Add New Trigger”
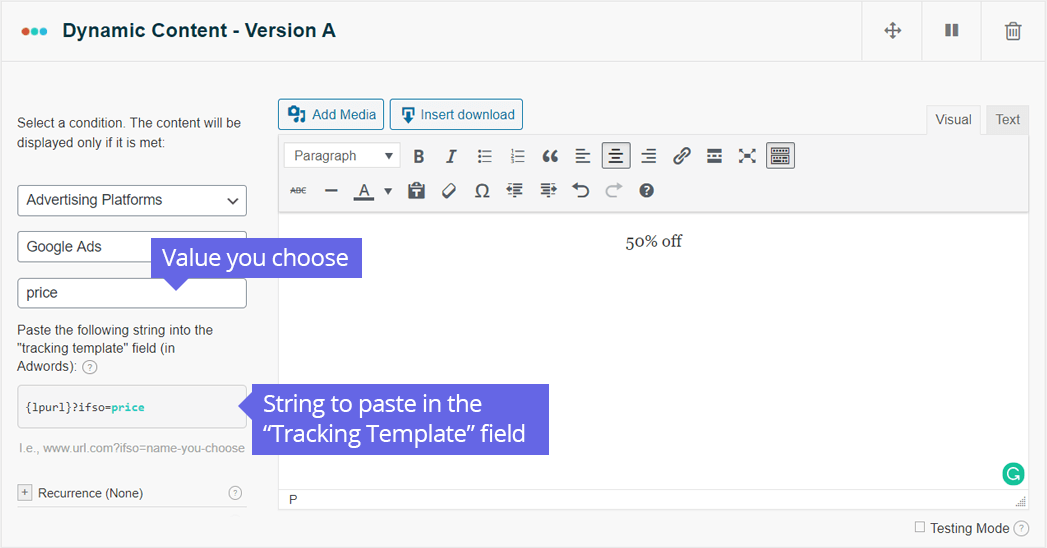
- Click on “Select a condition” and select “Advertising Platforms“.
- Select “Google Ads” (it should be the default selection, just make sure it is selected)
- Type in a keyword. It can be a word, phrase or one letter. This keyword will be the value of the query string that will eventually be added to the Final URL (ex. If you type “red” the dynamic version will be displayed if the query ?ifso=red will be added at the end of your page URL).
- In the content field of the version, set up the dynamic content.
- In the default content field, set content to be displayed as default, to users who do not arrive from your ads campaign. This field can be left blank if you don’t want to display anything by default.
- Press “Publish” and paste the shortcode generated by If>So in your website.
Part 2: Tell Google Ads when to show each version
There are to ways to set Google Ads to show the dynamic version:
1. Pasting the URL that includes the query string directly in the final URL field.
2. Using the “Tracking Template” field to make Google Ads adding the query string automatically a the end of the Final URL.
Option 1: Using the Final URL field
The Final URL is the URL address of the page on your website that people reach when they click your ad. Its value is set while creating your ad, but can be overridden if you fill it in the keyword level.
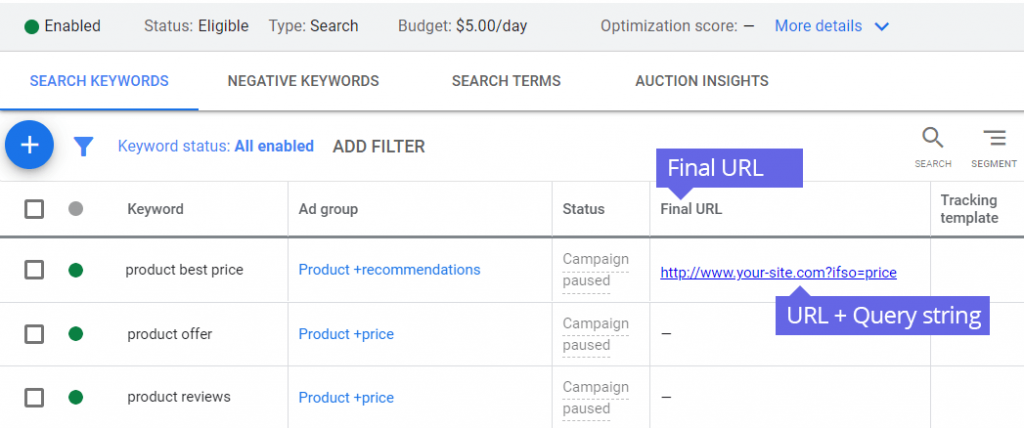
Setting up the Final URL in the Keyword-level:
- In the page menu, click Keywords.
- Add the “Final URL” column if needed. Learn more.
- Scroll over the “Final URL” column of the keyword you’d like to specify a landing page for and click the pencil icon when it appears.
- In the Final URL field, enter your landing page URL with the addition of the query string (i.e. your-site.com?ifso=value)
- Click Save.
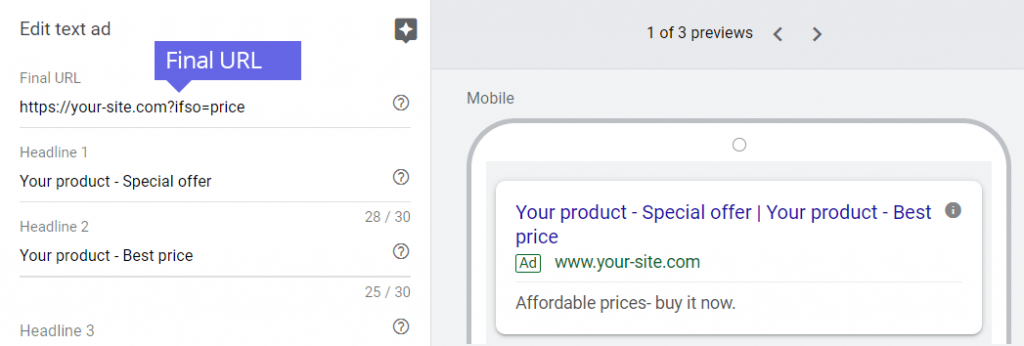
Setting up the Final URL in the Ad-level:
- Find the ad you’d like to edit.
- Hover your cursor over the ad’s name and click the pencil icon.
- Select Edit.
- In the Final URL field, enter your landing page URL with the addition of the query string (i.e. your-site.com?ifso=value)
Option 2: Using the Tracking Template field
The Tracking Template field exists in every level of your account (Account, Campaign, Ad-Group, Ad, and Keyword). It allows you to enter parameters the will be added to the Final URL you have set. In order to use the tracking template option in one of the levels of your account, you must first set up the final URL at that same level. More about tracking template at the Google Ads help center.

Setting up URL options at the ad group, campaign, or account level means that you can update your tracking information without resubmitting your ads for approval. However, if you set up or edit at the ad, keyword, or sitelink level, they will still need to go through review.
How to set up the Tracking Template in the Keyword-level:
- Click on the Keywords page menu.
- Add the “Tracking Template” column if needed. Learn more.
- Hover over any entry in the new “Tracking template” column, and click when the pencil appears.
- Paste the string found below the condition of the version from your If-So trigger. Paste the entire string, including the {lpurl}, the question mark, and then any ValueTrack parameter.
- Click Save.
How to set up the Tracking Template in the Ad-level:
- Click on the Ads & extensions page menu.
- Hover over the ad.
- Click the pencil icon when it appears.
- Expand Ad URL Options.
- Paste the string found below the condition of the version from your If-So trigger. Paste the entire string, including the {lpurl}, the question mark, and then any ValueTrack parameter.
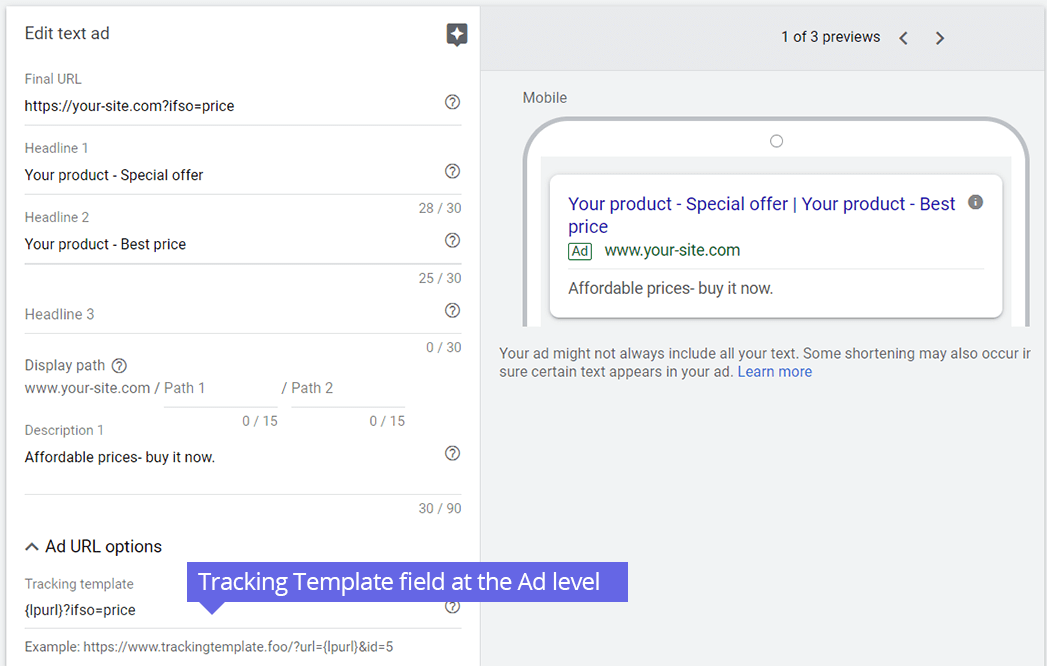
- Click Save.
How to set up the Tracking Template in the Ad group-level:
- Click on the Ad groups page menu.
- Add the “Tracking Template” column if needed. Learn more.
- Hover over any entry in the “Tracking template” column.
- Click the pencil icon when it appears.
- Paste the string found below the condition of the version from your If-So trigger. Paste the entire string, including the {lpurl}, the question mark, and then any ValueTrack parameter.
- Click Save.
How to set up the Tracking Template in the Campaign-level:
- Click on the Settings page menu.
- Hover over any entry in the “Tracking template” column.
- Click the pencil icon when it appears.
- Paste the string found below the condition of the version from your If-So trigger. Paste the entire string, including the {lpurl}, the question mark, and then any ValueTrack parameter.
- Click Save.
You can use the “Test” button to check that your tracking is set up correctly. Once you click “Test,” Google Ads will combine your final URL with any tracking you set up to make sure your ad will lead to a landing page URL. Learn more.


